

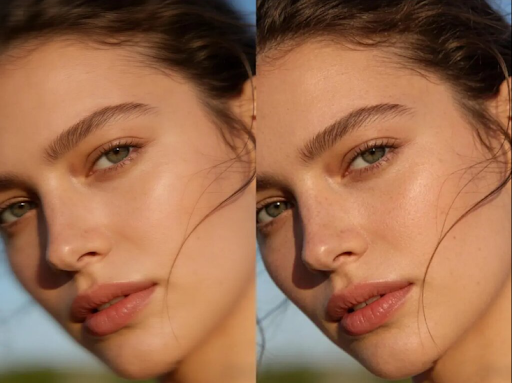
Midjourney V7 is a powerhouse for creating stunning, photorealistic portraits. You can generate incredible images with just a few words. But sometimes, you’ll notice something is slightly off. The skin looks a bit too smooth, the eyes are a little too perfect, and the overall image has a subtle, uncanny “AI face” quality. These texture glitches and waxy sheens can turn a great concept into a flawed execution.
Don’t worry, this is a common challenge. The good news is that you don’t have to settle for these imperfections. With a few post-processing steps, you can correct these glitches and elevate your AI-generated portraits from good to breathtaking. This guide will walk you through the exact process to fix unnatural textures and restore a human touch to your creations.
Understanding ‘AI Face’ and Texture Glitters
Before you can fix the problem, it helps to know what you’re looking for. The “AI face” phenomenon isn’t a single issue but a collection of small details that feel unnatural to the human eye. It often happens because the AI model tries to create a mathematically perfect version of a face, smoothing over the very imperfections that make us look real.
Common issues include skin that looks like plastic, eyes that are perfectly symmetrical but lack depth, and hair that appears like a solid helmet. You might also see strange artifacts in the shadows or highlights that don’t quite match the lighting. Learning to spot these subtle flaws is the first step toward creating truly believable portraits.
Step-by-Step Guide to Fixing AI Portraits
Fixing these images is a straightforward process. By breaking it down into manageable steps, you can systematically remove glitches and add realism.
Step 1: Identify the Key Problem Areas
First, you need to analyze your image with a critical eye. Open your generated portrait and zoom in. Don’t just glance at it, study it. Look closely at the skin on the forehead, cheeks, and nose. Do you see any pores or natural variations, or is it perfectly smooth?
Next, examine the eyes. Are the reflections, known as catchlights, identical in both eyes? Are the irises perfectly round and symmetrical? Real eyes have slight differences. Finally, check the hair and the transition between the face and the background. Look for any weird blurring, pixelated artifacts, or unnatural lines that give away the image’s AI origins. Make a mental note of the top two or three issues you want to correct.
Step 2: Use an AI Editor for Initial Cleanup
Often, Midjourney will add tiny, distracting artifacts to an otherwise perfect image. These might be stray pixels, a weird blotch on the skin, or an odd highlight on the clothing. Tackling these small problems first cleans up the image and lets you focus on the bigger texture issues. A simple and effective tool can make this process quick.
You can use a tool like the Magic Eraser to paint over and remove these unwanted objects instantly. Just upload your image, brush over the imperfection, and the tool will intelligently fill in the background. This is ideal for getting rid of minor glitches without needing complex software. It’s the perfect first pass to clean your canvas before moving on to more detailed edits.
Step 3: Correct Unnatural Skin Texture
The most common sign of an “AI face” is overly smooth, plastic-like skin. AI models often remove the natural pores, fine lines, and subtle color variations that make skin look real. Your job is to add that realism back in, but with a gentle touch. The goal isn’t to add wrinkles, but to break up the perfectly flat surface.
A great way to do this is with a Free AI Image Editor that allows for more nuanced adjustments. After uploading your portrait, you can often find tools to add a very fine layer of noise or grain. Applying a minimal amount of grain can simulate the appearance of skin pores. Start with the lowest setting and slowly increase it until you see a subtle, believable texture appear. This one change can make a massive difference.
Step 4: Refine Eyes and Facial Features
Eyes are the focal point of any portrait. When they look fake, the entire image suffers. AI often generates eyes that are too symmetrical, giving them a lifeless, robotic stare. To fix this, you need to introduce subtle imperfections. For example, you can slightly soften the catchlight in one eye or add a tiny shadow to one side of an iris.
Use your image editor’s tools to make small adjustments. You can lightly “dodge” (brighten) one part of an iris and “burn” (darken) another to create more depth. If the AI created an unnaturally sharp line on the lips or nose, use a softening or blur tool at a very low intensity to blend it more naturally. These minor tweaks break the perfect symmetry and bring life back to the subject’s face.
Step 5: Adjust Lighting and Shadows
Sometimes, the lighting in an AI portrait can feel flat, as if the subject is disconnected from their environment. Adding depth with realistic lighting and shadows is a crucial final step. This technique, often called dodging and burning, involves selectively brightening the highlights and darkening the shadows.
Focus on enhancing the natural contours of the face. For example, add a soft highlight to the bridge of the nose, the cheekbones, and the brow bone. Then, add subtle shadows under the jawline, along the sides of the nose, and in the sockets of the eyes. This creates a three-dimensional effect that makes the portrait pop. Always use a soft brush with low opacity to build these effects gradually.
Tips & Best Practices for Natural Results
Following the steps is important, but applying the right techniques will set your work apart. Here are some best practices to keep in mind.
* Work with Layers: If your editor supports layers, use them. Make edits on new layers instead of the original image. This way, you can easily undo changes, adjust the intensity of an effect, or delete an edit without starting over.
* Subtlety is Everything: The goal is to make the image look real, not “edited.” Every adjustment should be subtle. It’s better to make five tiny changes than one drastic one. If you can clearly see the edit you made, you’ve probably gone too far.
* Use Real-World References: Find a real photograph with similar lighting and use it as a reference. Pay attention to how light falls on the skin, reflects in the eyes, and creates shadows. Comparing your work to a real photo is the best way to guide your adjustments.
* Refine Your Midjourney Prompts: You can prevent some of these issues at the source. Try adding phrases like “natural skin texture,” “detailed skin,” “subtle imperfections,” or “asymmetrical features” to your prompts. Using `–style raw` can also help produce less opinionated and more realistic images from the start.
Common Mistakes to Avoid
As you get started, it’s easy to fall into a few common traps. Being aware of them can help you avoid them altogether. Over-editing is just as bad as the original AI glitch, so always aim for balance.
Here is a table outlining common mistakes and how to correct them.
| Mistake | Why It’s Bad | How to Fix It |
| Over-Smoothing Skin | Creates a blurry, even more artificial look than the original. | Instead of blurring, add a fine layer of texture or grain to simulate pores. |
| Adding Too Much Grain | Makes the skin look sandy or dirty instead of naturally textured. | Use the lowest possible setting for grain or noise. It should be almost invisible. |
| Making Eyes Too Sharp | Can make the subject look intense or fake, like a video game character. | Sharpen only the iris and catchlights, leaving the rest of the eye soft. |
| Ignoring Asymmetry | Perfectly symmetrical features are a dead giveaway of an AI image. | Make tiny, non-identical adjustments to each eye, eyebrow, or side of the mouth. |
| Creating Hard Shadows | Unrealistic, harsh shadows flatten the face and look painted on. | Always use a soft brush with low opacity (1-5%) to build shadows gradually. |
Conclusion
Midjourney V7 is an extraordinary tool for portrait creation, but it’s not always perfect. Learning to identify and fix common issues like “AI face” and texture glitches is a skill that will transform your artwork. By following a methodical process of cleaning up artifacts, rebuilding skin texture, refining key features, and adjusting light, you can add a vital layer of realism and emotion.
Remember that post-processing isn’t just about fixing errors. It’s a creative opportunity to infuse your artistic vision into the AI’s output. These techniques will help you turn impressive AI generations into truly flawless and captivating portraits that connect with the viewer on a human level.
 Hamza
Hamza  Blitz
Blitz